Five ways to bring “maker education” to your classroom

Here in Portland the Mini Maker Faire has arrived at the Oregon Museum of Science and Industry (OMSI). An annual fun-fest of tinkering and creating, the Maker Faire celebrates hands-on, informal learning. Maker education combines problem-solving, creativity, and engineering with an ethos of sustainable re-use, playfulness, and social value. Some emphasize the Maker Movement’s links to shop class and a renewed appreciation of trade and technical skills. Others focus on its gender-neutral approach to technology-as-craft and the value of production skills in a world that emphasizes shopping over creating.
Either way you look at it, there are serious pedagogical reasons to pay attention to the Maker Movement. “Tinkering” epitomizes the “ill defined” project so valued by constructivists, and of course student-directed and collaborative learning are a big part of the 21 st century skillset. As Maker Movement founder Dale Dougherty says in his introduction to Curt Gabrielson’s book Tinkering: Kids Learn by Making Stuff :
Tinkering is a process. It is an attitude. It is the means to fix, make, change, modify, and customize the world.
But what about standards?
Teachers may visit a Maker Faire and come away inspired, but also perplexed about how to bring that energy to their classroom in the era of standards and testing. There is a lot of discussion about how to map DIY activities to standards, but little, so far, in the way of detailed alignment or guidelines. That’s not coincidental, since Dougherty explicitly set out to “transform education” in response to current “rigid academic system” of standards and testing.
Because of this, classroom-based "making" is seen most often in private or charter schools like Lighthouse Charter School, where Aaron Vanderwerff has helped create a maker-focused curriculum. But Vanderwerff points out that bringing maker-education to your classroom doesn’t require a lot of space and “fancy tools” – just “a can-do mindset and a sense of adventure.” With that in mind, the following suggestions are aimed at helping teachers create fun maker projects that are do-able in class, affordable, and don’t require advanced tech or computer skills.
1. Explore and get inspired
Start by browsing through project ideas. There are great websites and books for this. Some good sites are:
Useful books:
Snip, Burn, Solder, Shred: Seriously Geeky Stuff to Make with Your Kids
2. Do crafty electronics
Squishy Circuits is a website with recipes for conductive and insulating play dough , which you can dye different colors. With some basic electronic supplies students can use the dough to connect components to LEDs, sensors, switches, etc. The Chibitronics Starter Kit combines crafting and electronics with stick-on LEDs and conductive copper tape. It comes with a “Circuit Sticker Sketchbook” with tips and examples. You can buy conductive ink to use with your LED stickers, but your students might like this video tutorial on how to make it in a chemistry lab. This project combines magnetic and conductive paint with LEDs glued to magnets on a wall. For kids who like to sew, Emily Lovell has created a great guide to making “soft circuits” out of fabric and conductive thread. More advanced examples of hand-sewn wearable computing can be found on a site called How to Get What You Want.
3. Build with cardboard and paper
There’s a great introduction to cardboard construction on this blog, and many great cardboard projects on Indestructables. It includes details on how to cut, crease, fold, notch, & join cardboard, along with a handy summary of what makes cardboard a wonder of structural engineering. Have your students apply their geometry skills by measuring, drawing, cutting (with help if necessary) and building with cardboard and paper. It’s also a great way to “up-cycle” used materials. For inspiration, show your students the Mike Leavitt's cardboard sneakers or the Tweenbot, a cheerful robot made of cardboard. Or watch this video about a guy who made a functional bicycle from cardboard! You can also download a wide range of nifty paper construction patterns with a membership to the Rob Ives blog shop .
4. Use a kit
If you cluster students in small groups for project-time, you can have each group invent something with a simple kit. The MaKey MaKey is a circuit board that turns everyday objects into computer touch-sensors. By connecting it to a computer and an object (like a banana) the object becomes a touch-sensitive input device that can activate a computer application.
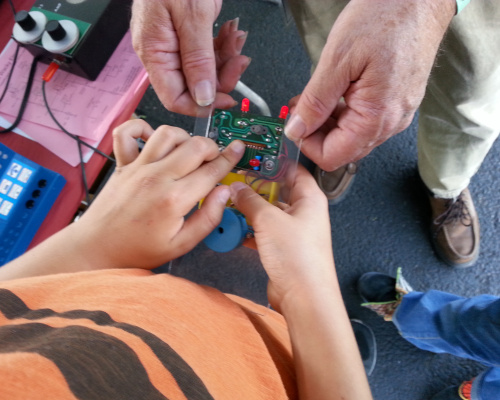
You can also teach soldering and electronics with a simple kit. The AdaFruit store has some great beginner kits like the Drawdio, which turns a pencil into a musical instrument when you draw or write. Basic kits cost between $15-$17 depending on the quantity ordered.
5. Design with an app
Start with apps. There are numerous tablet applications that will let students design, construct, and learn DIY skills. Alison Anderson has a good list many of them here.
In addition, there are a rande of vector drawing apps like iDraw, Tinkercad, and Inkscape, which create drawing that can be sent to a laser cutter for fabrication. If you want to inspire your students to think about designing for 3D printers, check out the MakerBot's Thingiverse website. The iCircuit app lets students learn electronics by designing virtual circuits. Then you can have them use Squishy Circuits recipes for conductive and insulating play dough to build their circuits!
If you've tried any of these or other maker projects with your students, post your comments and suggestions below!