Google Slides For Math

I’ve never been a fan of PowerPoint, so why should I be excited about Google Slides?
I admit, this was my big question when I was introduced to Slides: why should I care? But, now, I “get” Google Slides! To me, the primary difference is that—while PowerPoint is mostly a static tool for delivering a lesson—Google Slides can be used collaboratively for many purposes in the math classroom beyond the basic presentation. Each empty slide can be thought of as a blank canvas for students and teacher to work concurrently on a single presentation. This is the power of Google Slides: when students are contributing to the presentation, not just the teacher.
Two Types of Slides Assignments
This collaborative, “live-editing” feature of Google Slides allows for various classroom opportunities. Teachers can structure math lessons in two general ways:
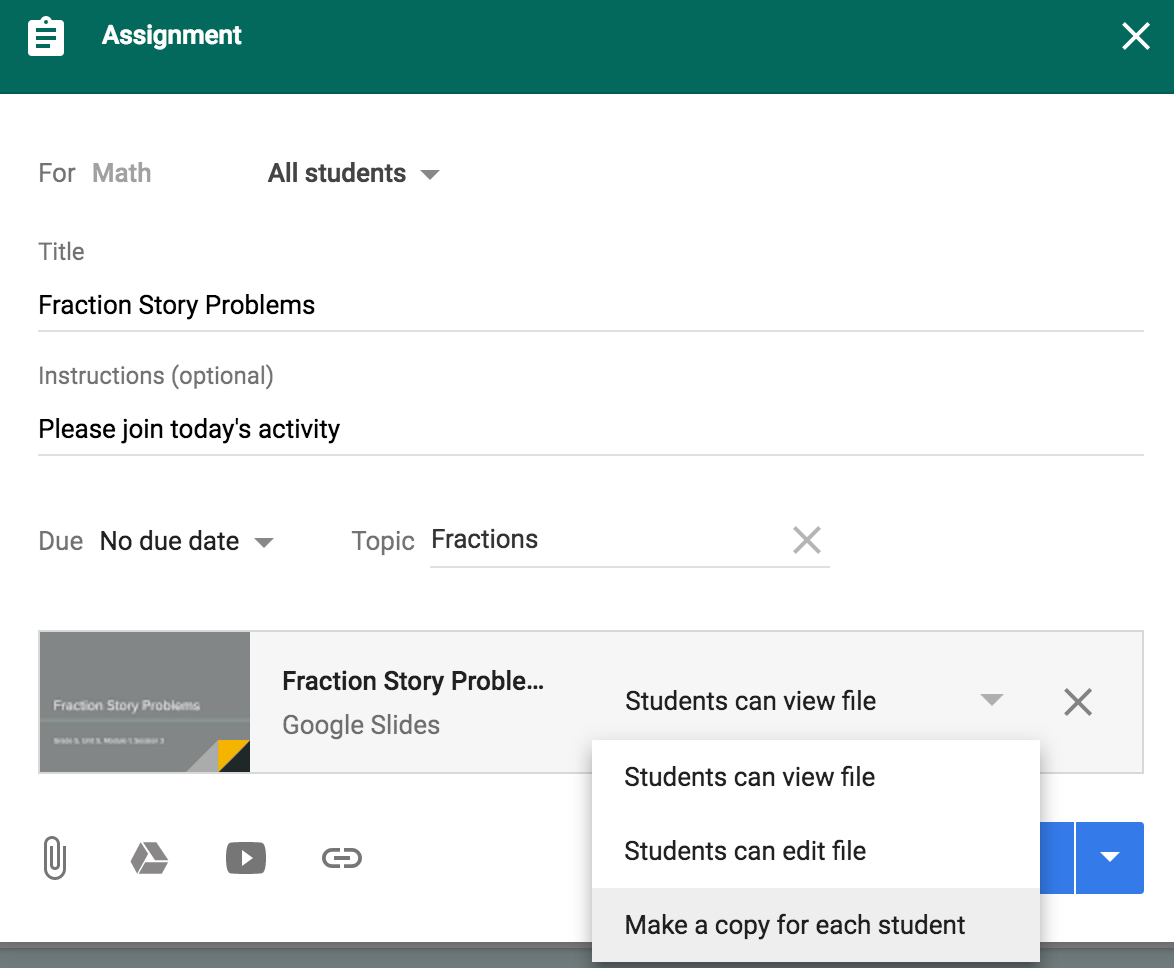
Individual assignment. Teachers create a lesson in Google Slides and then make a copy for each student. Students can then work through the Slides, adding their mathematical thinking and solutions. When they finish, students can turn in the Slides by sharing the link with their teacher. This type of assignment, whether completed as individuals or with learning partners, is great for capturing portfolio pieces and showing what students know. Check out a sample Slide assignment from the The Math Learning Center’s Grade 5 Bridges in Mathematics material.
Collaborative assignment. Instead of creating copies for individual students, teachers invite all students to edit a shared presentation at the same time. In essence, these types of assignments become digital math forums, where students share their strategies for solving a problem. After students add their solutions, they can review (and comment) on the strategies that others are using. Here is a sample for eliciting strategies for fractional parts of whole problems. Collaborative Slides can get messy with 30+ students editing at the same time, but teachers as the “owner” of the Slides retain control over when students can edit the presentation, and Version history provides full visibility over what students have added.
If you are interested in using either of these samples in your classroom select “Make a copy” under the File menu within the Google Slides presentation. Your own copy will automatically be added to your Google Drive. For those using Google Classroom, create an individual or collaborative assignment by choosing “Make a copy for each student” or “Students can edit file” in new assignment dialog box.
Getting Math into Slides
Once in a Slides assignment, students have plenty of options for getting their math onto the canvas.
Use your device camera: For students who prefer to show math on paper, they can continue to do so. Just have students take a picture with their device camera and then use the “Insert Image” options to add their work to a Google Slide. Review an Alice Keeler blog post for instructions on how to take pictures on any type of device.
Google Slides Tools: A wide variety of mathematical tools are built right into Google Slides. Students can add text, draw lines and shapes, or even create fractions with shaded tables. You can also place draggable stacks of images or markers off screen for students to drag onto the slide’s visible area.
Math Learning Center Apps: The MLC apps provide a flexible toolkit of virtual manipulatives and are just one screenshot away from being added to Slides. On Chromebooks, when students take a screenshot (Ctrl + Window Switcher Key), the screenshot is automatically saved to the clipboard. Back in Google Slides, all students need to do is paste (Ctrl + V) and resize the screenshot on the canvas.
Best Practices
If you are ready to start using Slides in your math class, here are a handful of tips for getting started:
- Organize your Slides as lessons. Include instructions in the opening slides and then introduce a task or series of problems. You can also include slides at the end for summarizing and reflecting.
- Customize your slide master by selecting Master under the View menu. Master slides are not editable by students, so if your instructions and images are part of the Master, students won’t be able to accidentally select and delete important information. You can also create designated layouts for student response slides.
- Change sharing settings with the blue Share button to control when and how students work in the Slides. For example, while you are giving instructions, give students view-only privileges and change to “Can edit” when you want them to get started. When it is time for students to comment on each other’s work, change access to “Can comment.” These changes can be done in real-time during class.
- Have quarter sheets of paper at the ready. Math is often easier shown via paper and pencil than with digital tools especially if students are new to using Slides.
- Discuss classroom norms with your class ahead of time. What are your expectations for student work? Student participation? As with any new classroom routine, you’ll have to work with students on the activity, not just the content. Debrief on what went well and what could be improved for next time.
- Publish Slides presentations to the web after lessons to share student work with family members and guardians at home, or keep a copy on your class webpage.